Concrete planters are easy, cheap to make
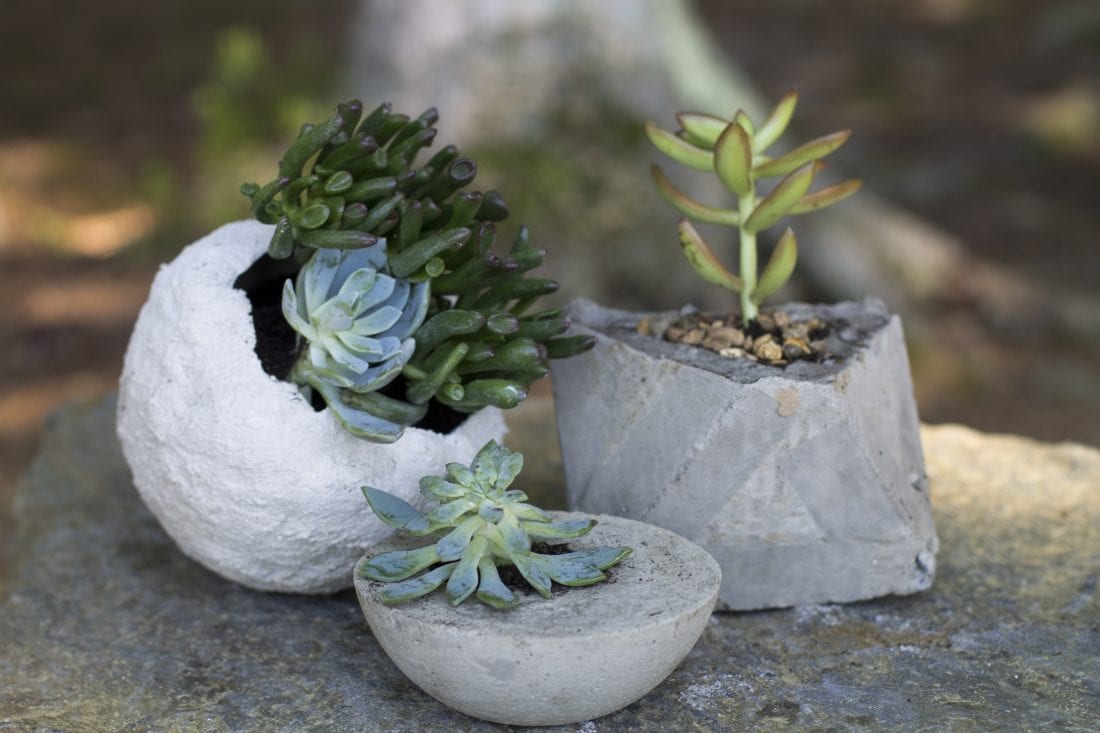
This July 7, 2019 photo shows small concrete planters in Strafford, N.H. Concrete planters can provide an industrial or rustic home for succulents and other small plants, and they're inexpensive and fairly easy to make. Spherical planters can be fashioned by applying cement to balloons, and bowls and other plastic containers can be used as molds for smoother results. A cardboard template taped together formed the mold for the more angular, geometric version shown here. (AP Photo/Holly Ramer)
What’s the difference between cement and concrete? Though the two terms are often used interchangeably, cement is an ingredient in concrete, which also includes aggregates like sand, gravel or stone. I knew nothing about either product when I decided to try making some rustic/industrial planters suitable for small succulents.
I found tutorials online involving molds filled with products to create vessels in all kinds of shapes and sizes. I settled on three techniques, one using balloons to create round planters, plastic cups and bowls and a third using a cardboard mold to make a faceted shape.
Here’s what I found, with each method rated from 1 to 10, with 10 indicating the least expensive, easiest and best results:
Balloons
The creator of the website Artsy Pretty Plants has used concrete to make planters out of eggs, wine corks and even a sneaker, but I decided to try her tutorial for molding cement around a balloon. She recommends Rapid Set Cement All, which I found in a 25-pound box for about $15. That made this project the most expensive, but I found it the easiest to mix.
This technique involves mixing the cement with water and spreading it over half an inflated balloon set over a cup to hold it in place. Once dry, the process is repeated on the other side, leaving some of the balloon clear to form the opening of the planter. The balloon is later popped and removed.
I ran into a bit of trouble because the gloves I bought were too big, making it unwieldy to apply the cement evenly. While the multiple steps stretched this project out longer than the other methods, the cement set quickly. The result was an intriguing shape and texture, definitely the most rustic of the three.
Cost: 6 Ease: 6 Results: 6
Bowls
The Garden Therapy website includes instructions on making planters using plastic bowls, food storage containers and odds and ends you might find in your recycling bin such as small plastic tubs or yogurt cups. This method recommends topping or repair concrete. I used Quikrete Sand/Topping Mix, which cost about $6 for a 60-pound bag.
Vegetable oil is essential for oiling the molds. After being mixed with water, the concrete is poured into a mold, and then a second, smaller container filled with rocks or pebbles is set into it, to weigh it down. Once the concrete hardens for 24 hours, the planters can be popped out of the molds.
I used a large cap from a container of laundry detergent for one of my inner molds, and was unable to remove it, probably because the surface had ridges and I didn’t get enough oil in them.
Cost: 8 Ease: 7 Results: 8
Cardboard
Geometric, faceted shapes are popular in home decor, and I had high hopes for the tutorial I found at Gray House Studio, which features gorgeous furniture plans, tutorials and decorating projects.
This method required a bit of prep work: Creating a mold out of cardboard. It was easy to put together and involved just taping together a series of triangles, but this would not be the method to use if you want to make a bunch of planters at the same time.
The recommended concrete, Quikrete Crack Resistant Pro Finish Concrete Mix, cost about $6 for 80 pounds, making this the most affordable technique. But, I found it harder to work with because it contained a lot of pebbles, and my finished product has some gaps where I didn’t completely fill the mold.
I also didn’t mix enough concrete to completely fill my mold, and had some trouble smoothing out the top, so my planter is not quite as even as the one featured in the tutorial. Marks from the tape I used on the mold also are evident, though it’s likely that I could sand the sides to minimize this. I am eager to try this method again using one of the other products, because I do like the modern shape it produces.
Cost: 9 Ease: 6 Results: 7
Lifestyle News
Museum to offer ‘farewell look’ at art exhibit
The public is invited to attend a farewell look at Echoes of Eden at the Thomas T. Taber Museum of the Lycoming ...
Concert salutes Broadway music
The May public concert of the Williamsport Music Club will be a program completely devoted to Broadway songs from ...

Muncy teenager earns Eagle Scout rank

Concert in Williamsport on Saturday to feature patriotic music

Over 500 breakfasts served at Sentimental Journey’s event
‘Betsy Ross’ to visit historical museum
The Thomas T. Taber Museum of the Lycoming County Historical Society will host its Society Program at 2 p.m., May ...